|
|
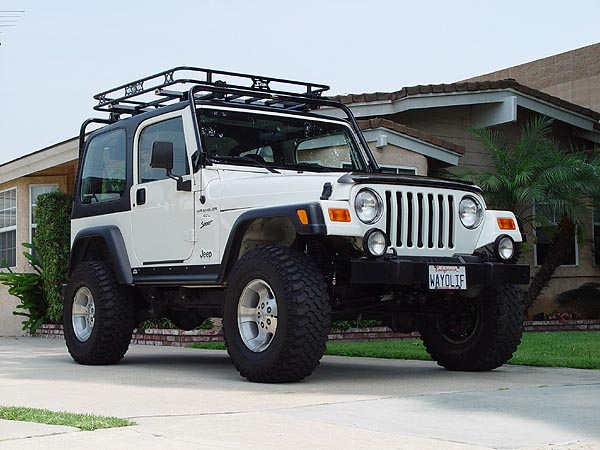
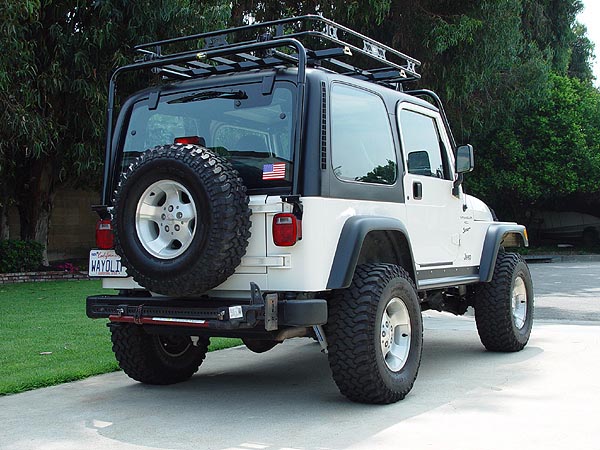
Mix-n-Match
Jeep TJ 3" Budget Lift
Like most Jeep
owners, I'm always on a tight budget and owning two Jeeps certainly
doesn't help. Any extra cash I have usually ends up in maintenance
so how's a guy like me ever gonna install a taller lift? Well, the
key is to be patient and tenacious.
Fortunately for us, we live in the era of the internet where information
is abundant and a good deal can always be found. It
has taken me almost two years to do but a lot
of the parts I needed, I actually got for FREE. The rest of the parts
I found in the "Used" forums and a few I bought new.
Special thanks needs to go to JohnDF for giving me his old Rusty's
3" Springs, michaleturtle1 for his Teraflex front trackbar/rear
relocation bracket and for all the people who sold me parts cheap.
For the record, this lift cost me less than $150 to do :-)
What
You Will Need
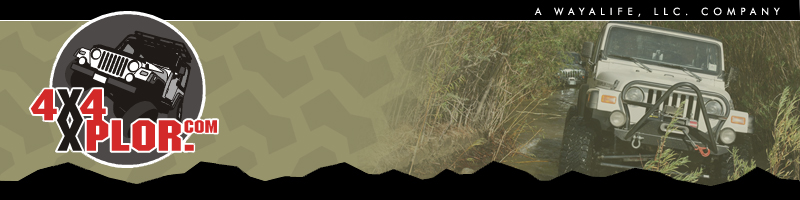
• 3"
TJ Lift Coils Front/Rear or ZJ V8 Front Coils*
• Longer Shocks to fit a 3" Lift
• Bump stop Extensions Front/Rear
• Extended Front/Rear Swaybar Links
• Adjustable Rear Trackbar or Relocation Bracket
• Adjustable Front Trackbar
• Metric (13,15,17,18,19 mm) Socket & Wrench Set
• SAE (1/2,9/16) Socket & Wrench Set
• Torx T-55 Bit
• Standard Ratchet
• Torque Wrench
• Spring Compressors (Autozone Rents them for FREE)
• Metal Drill Bits
• Jack stands (2 minimum - 4 preferred)
• 2.5 Ton Floor Jack or Better (21" or higher preferred)
• Wheel Chocks
• PB Blaster
• White Lithium Grease
• Hammer
* For those of you
doing a ZJ coil lift, you
will need to use the OEM TJ front coils in the rear. This will
yield you approximately 3" of lift total.
Installation
Before
you start, if
the bottom of your Jeep looks anything like mine does, take the time
and give it a good hose down before you do anything. If you live in
a state that salts their roads, it would be a good idea to do this
a few days in advance and then spray all the bolts you will be working
on (i.e. shocks mounts, swaybar links, etc.) with a good dose of PB
Blaster. Also,
be sure to park your Jeep on a flat, level surface like a driveway
before you do anything. Make sure you're in gear and the e-brake has
been applied.
1. I did get new rear coils but was told by the former
owner that they sagged so, for
the installation of this lift, I decided to start on front end just
in case I decided to use the OEM coils in the rear. Having
said all that, chock your rear wheels and then crack loose your front
wheel lug nuts.
2. Completely remove
your OEM swaybar links for this lift and eventually replace them with
extended links or quick disconnects. I already had a set of adjustable
JKS quick disconnects and just used them for this lift. To see how
to remove your OEM links and install a set of JKS quick disconnects,
CLICK HERE to see my write-up.
3. Jack up your Jeep
from the axle, remove your wheels and then carefully lower it back
down on to jack stands placed just behind the lower control arms.
4. Be sure to place
your wheels behind your jack stands underneath the frame rails for
added protection.
5. Remove your front
shocks. This can be a bit tricky as the top of the shocks are studs
fastened by two nuts. You will need a small open ended wrench to hold
the lower nut as you unscrew the upper locking nut. Or you can to
use a pair of pliers or small wrench to hold stud (to prevent the
whole shock rod from spinning) while removing one nut at a time.
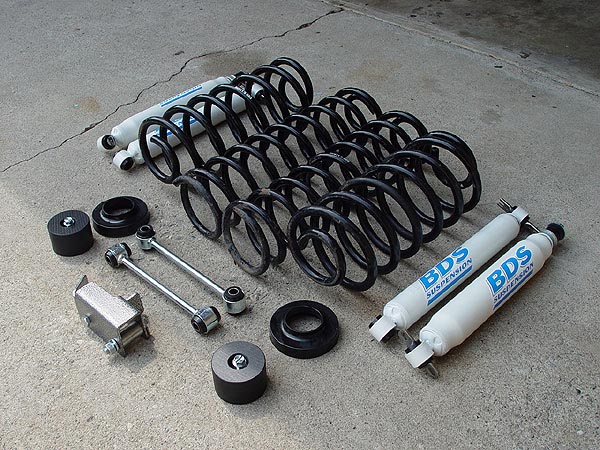
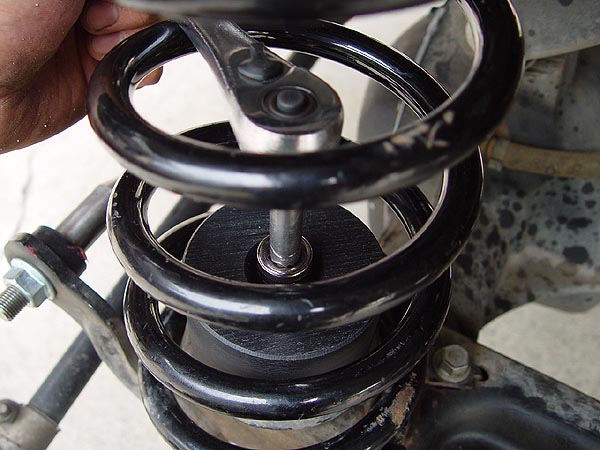
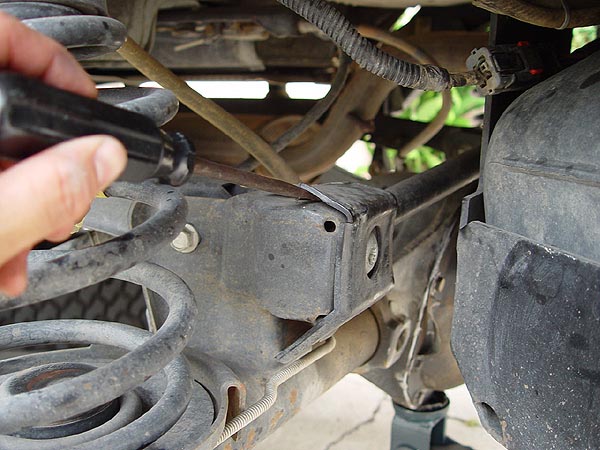
6. Remove the retainer
holding down the spring on the driver side as shown on the pic to
the right. Most TJ's will not have a retainer on the passenger side....
but I have heard of some 1997 and Canadian models do.
7. Start jacking up
the axle from the driver side carefully until your can remove the
spring on the passenger side. Be sure you pay close attention to your
brake lines while doing this. If you have a budget boost already installed
like I did, this may be a bit difficult to do and the assistance of
spring compressors will help out a lot.
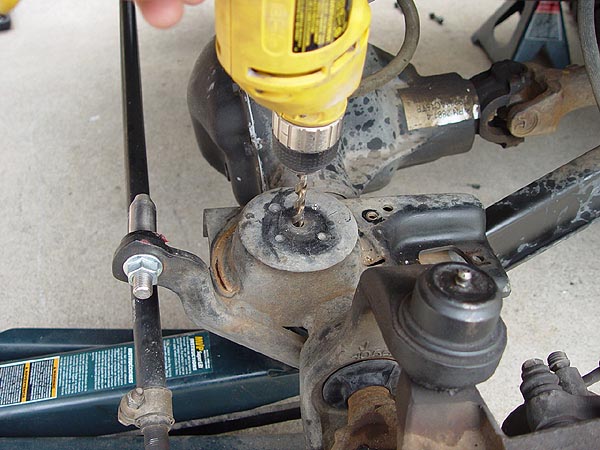
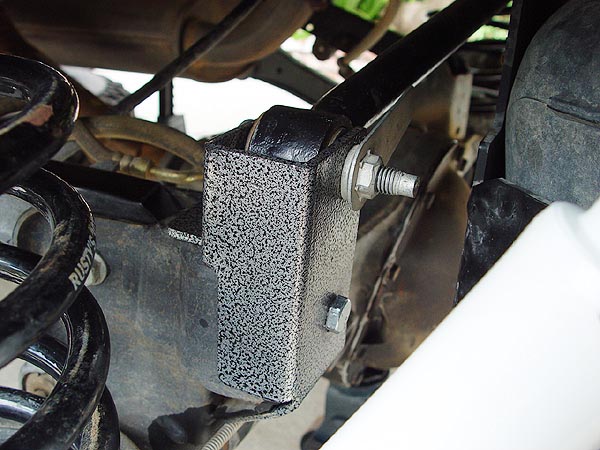
8. Now to address the
bumpstops. After doing a lot of research, I decided to get front bump
stop extensions from Rubicon Express that bolt to the bottom spring
perches as opposed to extending the length of the factory bumpstops.
The problem with extending the factory set is that they can get hung
up in your springs while flexing. In hindsight, I think a couple of
hockey puck could do the job just as well.
Anyway, start this part of the install buy drilling a hole through
the center of the bottom spring perches using the appropriate size
drill bit (a tiny bit smaller in diameter than the bolts you are using).
The bolts supplied with the Rubicon Express kit were self-tapping
and I would recommend you getting the same if you are going the hockey
puck route.
9. Pre-thread the holes
you just drilled by ratcheting on the self-tapping bolts. Make sure
to do this slowly and back out often to create clean threads. Do not
mount the bump stop extension at this time as it will make installing
your new coils very difficult.
10. Using
your spring compressors, compress your new coils enough to make it
easier to install. Slip the bump stop extension and your new coils
into place at the same time and then affix the bump stop extensions
to the spring perch using the self-tapping bolt supplied as shown
in the pic to the left.
11.
Repeat steps 7-10 on the opposite side of your Jeep.
12. Install your new
shocks (see step 12 under my RE Budget
Boost Install for instruction on how to insert barpins),
re-attach your wheels, remove the jack stands, lower your vehicle,
torque down your lug nuts to 90 ft. lbs. and then install your new
front swaybar links.
CLICK HERE FOR JKS QUICK DISCONNECT
INSTALL
13. Chock your front
wheels and then just crack loose your rear lug nuts so that it will
be easier to remove once your Jeep is in the air.
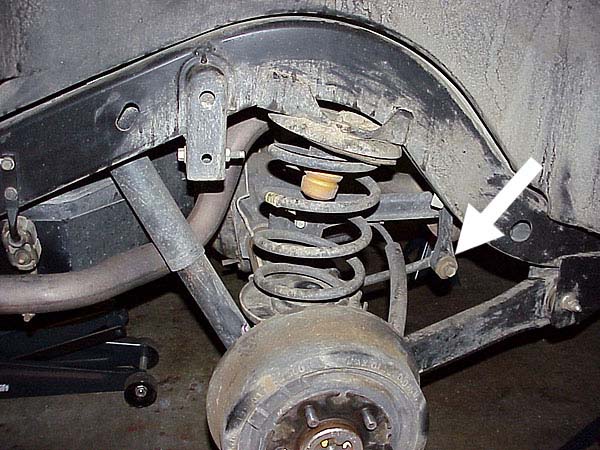
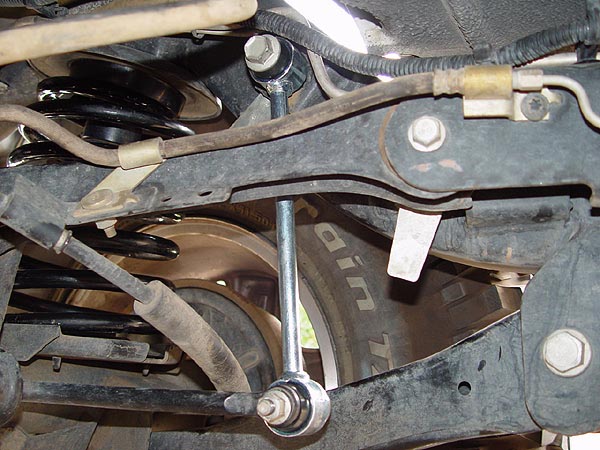
14. Remove your rear
swaybar links on both sides of your Jeep as indicated by the arrow
in pic to the left.
15. Jack up the rear
of your Jeep from the differential enough for you to remove your tires
and then lower it back onto jack stands. Make sure your stands are
placed underneath your frame rails just in front of your rear tires
and leave your floor jack holding up your axle.
16. Again, place your
wheels in front of the jack stands underneath the frame rails for
added protection.
17. Remove your rear
shocks and then lower your floor jack so that your axle hangs at a
full droop.
18. Reposition your
floor jack under the driverside of your axle and then carefully jack
it up so that you can remove the coil on the opposite side. Again,
spring compressors really come in handy here. Also, be sure to go
slow and make sure none of your brake lines are put under too much
stress.
19. Remove your spring
and then the rubber bump stop by firmly grabbing it and then working
it back and forth until it comes out.
20. For the rear, I
just kept the bump stop extension I had from my old budget boost.
However, if you are installing a new set, here's what you need to
do: Inside the bump stop retaining cup, you will notice a bolt holding
it in place. Remove this bolt and the replace it with the longer one
supplied in the Rubicon Express kit. Place the new bump stop extension
over the bolt, then the spacer over the extension. Re-attach everything
to the upper spring perch.
21. Compress your new
coil using your spring compressors and then slip it back into place.
Lower your floor jack so that your axle is hanging again and then
repeat steps 18-20.
22. Now it's time to
install your new rear trackbar or relocation bracket. Contrary to
what some may say, this is actually really easy to do if you just
take your time. To start, jack up your axle from the differential
as close to a point where it would be if your Jeep were on the ground
with its tires on. The closer you are the easier everything will come
apart.
23. Remove the nut and
bolt holding the OEM trackbar to your frame (passenger side of your
Jeep). If the bolt seems to be in really tight, try raise or lower
your axle ever so slightly as is necessary until it begins moves easier.
You may also need to give the bolt a slight tap with a hammer to get
it out but you shouldn't have to bang on it.
24. Now go to the driverside
of your Jeep and remove
the plastic dust cover off of your trackbar mount using a screwdriver
and discard. You will not be re-using it. Now remove
the bolt attaching your trackbar to your axle.
25. Install your new
adjustable trackbar or relocation bracket. I installed a Teraflex
bracket which came with all the hardware necessary but I did need
to drill a couple of holes wider in the axle flange to get a couple
of the bolts through. Be sure to torque everything down to the manufactures
specs. If the nuts supplied are not lock nuts, be sure to use some
lock-tite on them. The main trackbar bolts should be torqued to 85
ft. lbs.
26. Your rear shocks
should have come with two metal sleeves. Slide these into the bottom
bushings and then install your new rear shocks. Re-attach your wheels,
remove the jack stands, lower your vehicle, torque down your lug nuts
to 90 ft. lbs. and then install your new extended rear swaybar links.
27.
Follow the rear axle breather
hose up to the gas filler hose, cut the zip tie holding it there and
then re-zip tie it on at a slightly lower location to relieve any
tension created from the lift. The front of my hose seemed to be okay
so I just left it alone.
28. You will
most likely experience driveline vibes now that you are 3" taller
than stock. The cheap and easy way to fix this is to lower your transfercase
skidplate an inch. However, I chose to get a 1" MORE Motor Mount
Lift instead and you can see my installation write-up by clicking
on this link:
MORE 1" MOTOR MOUNT LIFT WRITE-UP
Be sure to get a front end alignment after finishing
this job.
Congratulations, you are now 3" higher!!
NOTE:
Last
but not least, I
finally got a hold of a used TeraFlex adjustable front trackbar from
michaelturtle1 a few weeks after installing this lift but it was in
need of some real help. Click on this link to see my write-up:
TERAFLEX ADJUSTABLE FRONT TRACKBAR
WRITE-UP
Post
Installation Notes:
One
Month Later
Well, it's been about a month since I installed this lift and all
I can tell you that it is awesome!! These coils did in fact give me
about a 3" lift but I did have to use a pair of 1" coil
spacers in the rear to compensate for sagging due to the weight of
my roof rack.
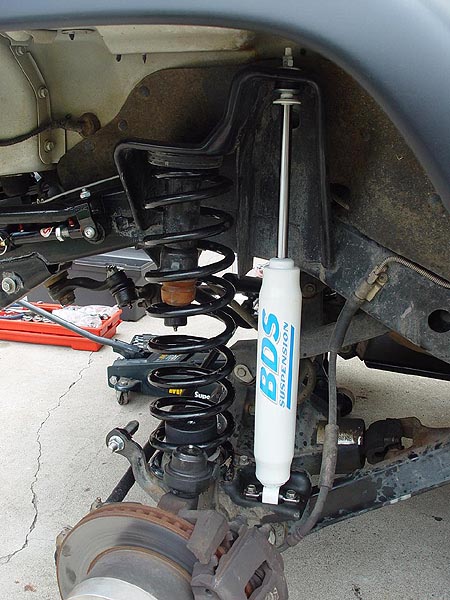
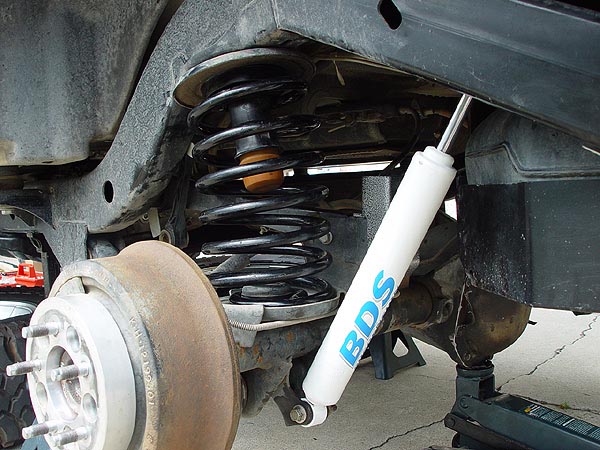
The BDS shocks that I picked up for this lift offer one of the best
rides I have experienced in a TJ and would highly recommend it to
anyone looking for a set. In my opinion, these ride far better than
even my old DT3000's which I really liked a lot.
I have yet to take my TJ out on the trails since installing this lift
but I will be sure to make a note of it once I do :-)
09/20/03:
As luck would have it, even with the addition of 1" spacers,
my rear coils sagged enough under the weight of my hardtop and roofrack
that the shocks were practically sitting at its collapsed height on
level ground.... not good. While on the road they experienced no problems,
I'm quite confident that they would bottom out like crazy on the trail.
Needless to say, I gonna have to replace them with a new pair of shorter
shocks.
09/27/03:
Well, I was only going to get a new pair of rear shocks but thought
that a set of four would be easier to sell.... and it was. Once sold,
I used the earinings plus a gift certificate I had with Q-tec to get
a set of Doetsch Tech Pre-Runner DT8000 shocks. At $40 a pop, these
were slightly cheaper than BDS shocks (which they unfortunatly do
not sell) and a bit more than DT3000's but I was still able to get
them for very little extra cash out of pocket. I went with the DT8000s
this time around because they are supposed to be a little firmer then
the DT3000s. After installing them I can tell you this, they are a
lot firmer. Although the BDS shocks offered a much better ride in
my opinion, I think the new DT8000 ride pretty good too and I really
like the fact that they can be mounted can up (upside down). It's
a good thing too cause the shock can is considerably wider in diameter
than the BDS shocks and they would definetly make contact with the
lower spring pearch at a full droop if I mounted them right side up.
I will follow up on how things go once I've had a chance to take my
Jeep out on the trails.
10/01/03:
Finally rebuilts the adjustable front track bar I got from michaelturtle1
and installed it. Be sure to check out my write-up by clicking here:
TERAFLEX
ADJUSTABLE FRONT TRACKBAR WRITE-UP
10/22/03:
To fix my saggy rear end, I added an Air
Lift Suspension to my rear coils. This effectively gave
me almost 4.5" of lift in the back so I added 1" coil spacers
up front to help level things out. Needless to say, I now am sitting
on a 4" lift :)
|
|
|